How to Setup RR Mail for Windows 10 using Windows Live Mail?
Although the Mac and Windows come with the Preinstalled Email Service, if you still want to go for the RR Mail, then don’t worry. Today we shared the complete guide to Setup Mail for Windows/Mac with separate settings for you.
To set up the Roadrunner on your Windows or Mac device, you must configure the proper Server Settings. Regarding this, we must configure the Required Port Numbers to set up RR Mail there.
Setup RR Mail for Windows 10 using Windows Live Mail
For Windows users, you have got the preinstalled Windows Live Mail app. So, this tutorial is based on how to Setup roadrunner mail in Windows using the Live Mail App,
Please search for the Windows Live Mail app on your Windows and Open It.
Go to the Accounts tab and select the email from the given drop-down.
Now enter your email address & password there and click on the Next icon.
From the Server type, choose the POP or IMAP, configure this value,
POP Settings
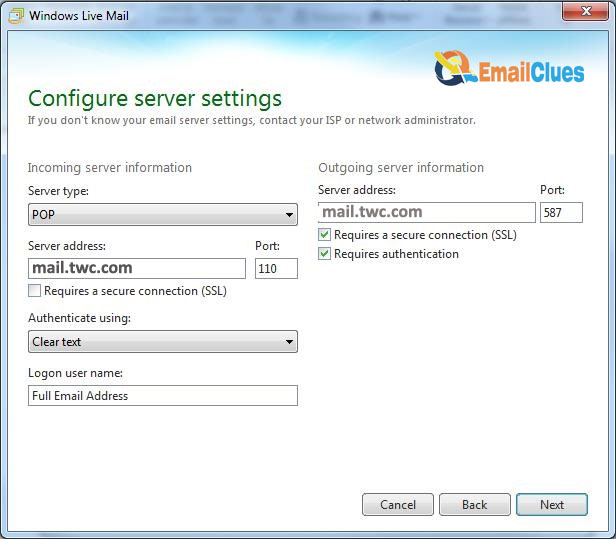
Incoming mail Server: mail.twc.com
Income Server: 110 POP3 Port
Outgoing Mail Server: mail.twc.com
SMTP Port: 587
Outbound and Inbound Email: You can enter your mailing address
Outbound and Inbound Password: Enter your password there
SMTP Server requires authentication: Checked
IMAP Settings
Incoming mail Server: mail.twc.com
Income Server Port: 143
Outgoing Mail Server: mail.twc.com
SMTP Port: 587
Outbound and Inbound Email: You can enter your mailing address
Outbound and Inbound Password: Enter your password there
SMTP Server requires authentication: Checked
After adding the value, click on Properties to make changes to your Account.
Now go to the Servers tab to make the settings changed.
Choose your RR Mail Account from the Send/Receive drop-down Menu.
That’s it.
With these steps, you can set up RR Mail for Windows using Windows Live Mail. But if you are running on the newer version of windows, then you may miss the Windows Live Mail. So, to set up rr mail with another method, you can check below.
Setup RR Mail for Windows 10 using Mail App
Mail is one of the default mailing apps by Microsoft, and here we are not talking about MS Outlook. It’s just a windows Mail app, which you can get in your Windows as a preinstalled app. So, using the Mail app, you can also set up rr mail easily.
Find and Open the Mail app on your Windows.

From the Menu of your Mail app, click on Add Account. If you don’t have an email account setup, you can get the direct option in the app’s dashboard.
After clicking Add Account, you need to enter your Roadrunner Login Details.
On the next page, click on the Account Type.
Now click on Advanced Setup>Internet Email.
After that, configure the Email Settings there.
Enter your POP3 Account Settings (You can check the POP Settings above).
Follow the on-screen instructions to set up your RR Account.
Setup RR Mail for Mac on Mail App (Automatic Process)
To Add a Spectrum email account to your PC, you must install the Mail App. If you don’t have installed the Mail app, then install the app first and follow these instructions,
Open the Mail App on your macOS.
Go to the Other Mail Account>Continue.
Now enter your RR Email login details there.
Enter mobile.charter.net in the Propted description field. Note: When the description field enters the charter, you need to delete it and enter the new variable, i.e., mobile.charter.net.
Follow the On-Screen Instructions and set Setup your RR email account on Mac.
Setup RR Mail for Mac on Mail App (Manual Process)
For Macintosh OS users, the automatic Process may only work sometimes. So, in this situation, you can move towards the Manual Process. Here’s the tutorial on setting up roadrunner mail on mac.
Open the Mail Application on your Mac.
Go to Preferences>Add a new account.
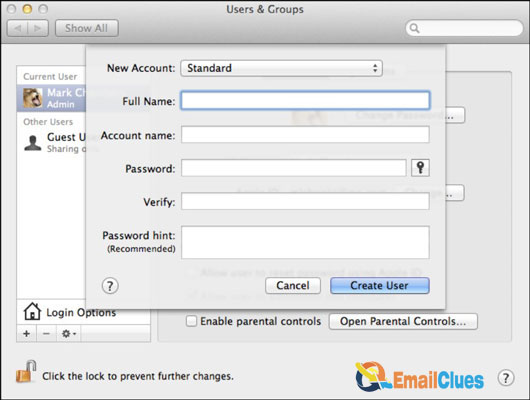
To add the roadrunner email account, click on the + icon on your keyboard. If it doesn’t show the Roadrunner, you need to manually enter the service provider.
Now enter your RR Email account details there and click on the Next page,
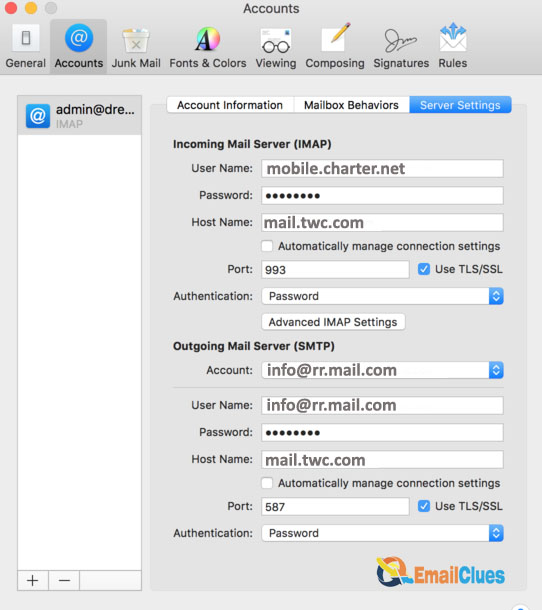
Choose the Account Type to IMAP or POP.
Enter the Server Setup Settings for IMAP and POP. You can find these settings above.
Configure the server settings and follow the on-screen instructions.
After these steps, you can easily set up Roadrunner Email Settings on your macOS. If you still have a problem with the Manual and Automatic Settings for RR Mail configuration, then you can go for the Roadrunner Email Support.
FAQ
What are the Required Port Numbers for IMAP and POP for RR Mail?
You must set the IMAP Port number to 587, whereas the POP Port Number must be 995.
How to fix Roadrunner not sending Emails Problems?
To fix the rr email not sending issue, you must have the correct recipient, a high-speed connection, and a compatible device.