Setup RR Mail Settings in Thunderbird
Roadrunner mail is an advanced email service from Time Warner Cable. It’s also like other email service providers, including Gmail, Ymail, etc.
Thunderbird is an email service client. Like Gmail and Outlook, it’s one of the email service programs. By adding your web-based email management tool to Thunderbird, you will have the space to store and track emails and contacts.
Setup RR Mail Settings in Thunderbird
You need to follow some steps to set up your RR Mail Settings Thunderbird. You must set the Incoming Mail Server (IMAP Settings) and Outgoing Mail Server (SMTP Settings), including the recognized port number.
Step I – Add Account
You can check out these steps if you want to add the roadrunner email to your Thunderbird.
Go to your Thunderbird app on your PC.
Click on the Edit option from the Menu Bar.
Click on the Account Settings there.
Now click on the Add Account. You can get it at the bottom of the Window.
From there, click/select Email.
Now enter your name and your Time Warmer Email Address there.
After that, you need to setup up the IMAP and SMTP Settings.
Step II – Set Incoming Mail Server/ IMAP Settings
After adding your Roadrunner Email Account, you must set up an Incoming Mail Server. Here’s
IMAP Settings For RR Mail
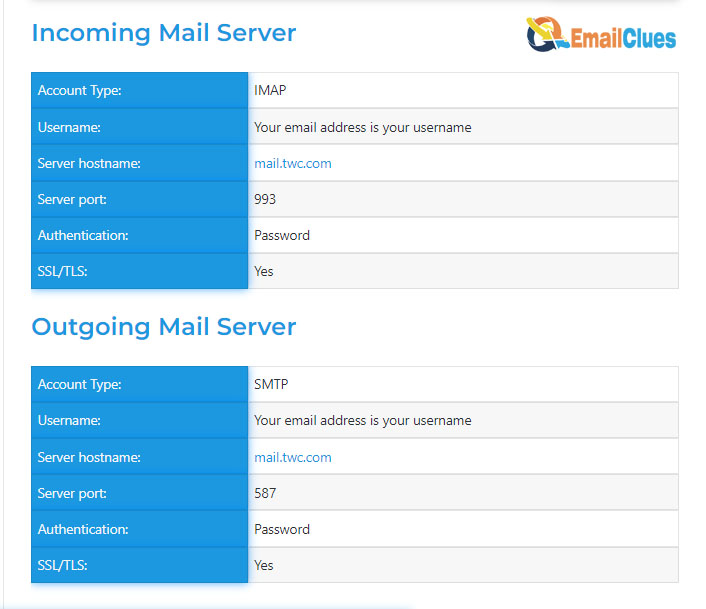
Rr.com (RoadRunnder/TWC): mail.twc.com
Port: 993
IMAP Security: SSL/TLS
Username: you can enter the full name or email address before @
IMAP Password: Set the Password the same as your Email
Incoming Mail Server: pop-server.roadrunner
Step III – Set Outgoing Mail Server/ SMTP Settings
Like an incoming mail server, you must set an outgoing mail server. The SMTP Server Settings must be configured here.
SMTP Server Settings to Access RR Mail
Rr.com (RoadRunner/TWC): mail.twc.com
SMTP Port: 587
SMTP Security: STARTTLS
SMTP Username: you can enter the full name or email address before @
SMTP Password: Set the Password the same as your Email
Outoging Mail Server: smtp-server.roadrunner.com
Send/Receive is not working in Thunderbird.
If you cannot send or receive the Message in your Thunderbird using any mail services, you must find several reasons. Possibly it’s due to Server Issues or blocking by Antivirus software. Here are the methods to fix Send or Receive not Working in Thunderbird.
The method I – Whitelist Thunderbird from Security Software
If you are using antivirus tools in your system, then there’s a possibility that your antivirus app may blocklist the app. If that’s the case, you must provide the authority to trust Thunderbird with your Antivirus software.
Go to the Settings on your PC.
Find the Update & Security option and choose the Virus & Threat Protection Option.
Now click on Add an Exclusion option from Add or Remove Exclusions.
From there, select Thunderbird.
That’s it.
Configure the Thunderbird in Windows Firewall
Search for the firewall in the windows search bar.
Open the Firewall & Network Protection settings there.
Find/click on the Allow an app through firewall.
Now click on the Change Settings button there.
Add the Thunderbird App to the list.
At last, click on the Allow another app.
That’s it.
Method II – Recongifure the IMAP Settings
To receive the mail, you need to set up the IMAP Settings. So, you need to check the IMAP Settings once here. Make sure the IMAP Settings are mentioned above.
Open the Thunderbird Application in your system
Go to Account Settings there.
Check your username and Password.
Correct the SMTP Server Settings.
Method IV – Update your Mozialla Thubnderbird App
Updating your Thunderbird is one of the good steps to fix the Message Cannot Be Sent error. Also, it helps to secure your mail with higher security standards.
Method V – Try Resetting the SMTP Password
Although it’s not recommended steps to fix the Thunderbird: Message Cannot be Sent error, you can still try this.
Go to the Tools>Options section.
Click on Security there.
Click on the Password and delete the SMTP Password.
Method VI – Switch to another Email Client
If you are still getting the Send/Receive not working problem with your Thunderbird, then you can migrate to another client easily. For this, you can choose Outlook or even MBOX.
How to fix the Asking Password Every Time in Thunderbird?
If Thunderbird asks you to enter your Password in every session, then you must need to configure these minor steps,
Go to the Tools section of your Thunderbird email.
Move to the Account Settings>Outgoing server.
After that, click on Edit.
Deselect the Use name and Password from the Security and Authentication.
At last, click on OK>OK.
That’s it.
It Says Connection Failed on Thunderbird. How do we FIX It?
If you always receive the Secure connection failed error while using the Thunderbird, then you can try out these possible fixes,
Step I (Checking) – Check the DigiCert SHA2 Secure Server CA
Open your Thunderbird app and go to Options>Advanced>View Certificates.
From the Certificate, Manager selects the Authorities.
Scroll down and find the authorities list to find DifiCert Inc. There.
Now find the DigiCert SHA2 Secure Server CA entry there.
If you can’t find this entry, move toward the Next Possible Method.
Step II (Solving) – Fix the DigiCert SHA2
Go to the browser of your PC and get the following link.
Now go to Tools>Options. Advanced.
Click on View Certificates there.
Select the Authorities from the Certificate Manager.
Scroll down to find DigiCert Inc. From the list there.
After finding the DigiCert SHA2 Secure Server CA, click it.
Now click on the Export option.
Step III – Importing the DigiCert SHA2 Entry
Get back to the Certificate Manager.
Click on the Import option.
Select the DigiCert file you just exported and downloaded.
Now restart your Thunderbird.
That’s it.
How to Fix if Thunderbird Does not Recognize Port Number
You can check the account settings if Thunderbird fails to recognize your SMTP or IMAP port number. Here’s how,
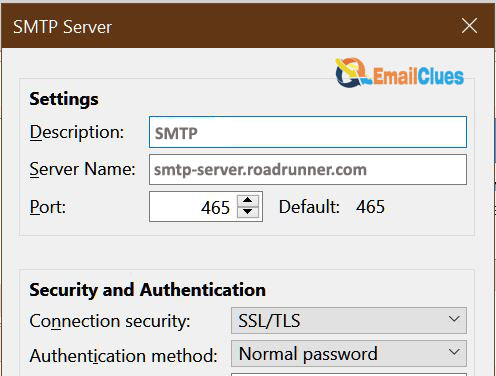
Go to the View Settings for this Account.
Change/correct the SMTP Server details,
Connection Security: SSL/TLS
Port: 465
How to fix the Outgoing server stopped in Thunderbird?
It may be an issue if you are using the VPN connection in your system for any purpose. So, to fix the Outgoing Server Stopped, you must disconnect the VPN and try once.
Similarly, Thunderbird doesn’t have servers and accepts connections from any network. For this, it will be best to migrate to other email clients like Outlook, Gmail, GMX, etc.