How to enable and use Wake on LAN (WoL) on Windows 10?
WoL is one of the minimal technology used to power the PC remotely over a network. It’s one of the best and unique features that helps to control or trigger your computer remotely. As we can use it to turn on the PCs remotely over the same network you just need to configure it first. Here’s how to enable and use Wake on LAN on Windows 11 & Older Version PC.
Wake on LAN (WoL) on Windows: Purpose of the WOL feature?
Wake on LAN is based on the network server that helps to send and receive the commands remotely. With this feature, the users can easily access the files and data with minimizing the power usage of another connected computer.
The computer can send and receive information called packets. Also, after enabling the WoL in BIOS or UEFI over the Windows Network Adapter one can use the other tools to send a magic packet over a network with the MAC Address of the particular connected Computer.
Enable Wake on LAN on Windows 10
Wake On LAN features the System to Wake up the remotely connected device with the help of the Wake on LAN utility. To get access to the WoL features on your Windows you just need to enable it first from the Network adapter of your Windows. Here’s how you can Enable Wake-On-LAN to use it.
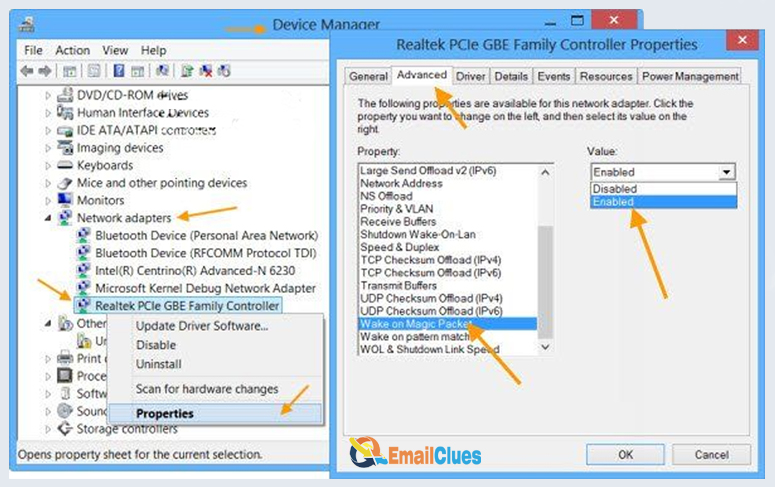
- Go to the Device Manager in your Windows. Press the Windows + X from the keyboard for a shortcut.
- From the Device Manager expand it and Select the network adapters from there.
- Right-click on the particular network and then Click on Properties.
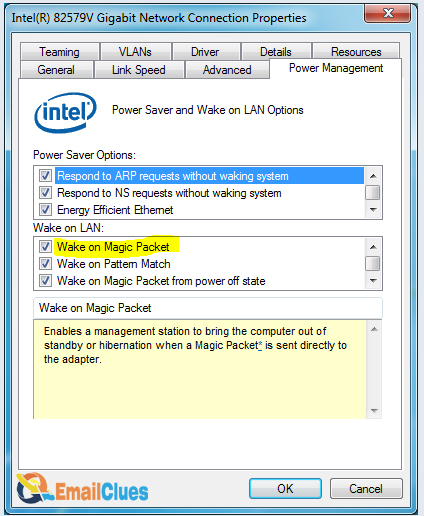
- From the Pop-up of Properties click on the Power Management option.
- Check all the three given options there and hit Enter or Click on OK.
- Select the Advanced tab there and then find the Wake on Magic Pocket option from the Property: options.
- Select and Click on OK. Make sure the Value is Enabled there.
Alternatively,
- Open Settings>Network & Internet.
- Click on Status and then go to Advanced Network Settings.
- Select the Change Adapter Options there. It will open the control panel on your screen.
- Over the Network and Connections, you need to select and right-click on the particular Network adapter.
- Select the Properties from the particular network. It will open the pop-up window on your screen (Ethernet Properties).
- Go to the Networking section/tab there and click on Configure option from there.
- Go to the Advanced tab on the next window and select the option
That’s it. After this process, your device is ready to perform a remote magic packet. With these simple steps, you can configure Wake on LAN on Windows 10.
Configure Wake on LAN on Windows 10
To wake up your computer remotely you just need to configure WoL. You can download the subsidy tools to make it easy for your work. Here’s how to configure Wake on LAN in Windows 10.
Go to Settings>Network & Sharing.
Right-click on the particular Ethernet connection and click on Details.
Note the Physical Address shown on the Network Connection Details from there.
Download the Wake On LAN tool for your PC.
Open the WoL and click on File>New Host.
Under the Properties shown in the Pop-up Window go to the Display Properties section.
Give the Name and Group of the Properties.
Select the Wake-Up and Enter the MAC Address.
Choose the Broadcast IP, and Set the Broadcast to default.
Enter the FQDN/IP Details.
Choose your Ethernet Adapter from the bIPV4 Interface information.
Leave the UDP Port and TTL as default and click on OK.
So, with these steps, you have successfully configured your WoL on your Windows. After that, you can easily wake up your Computer with WOL.
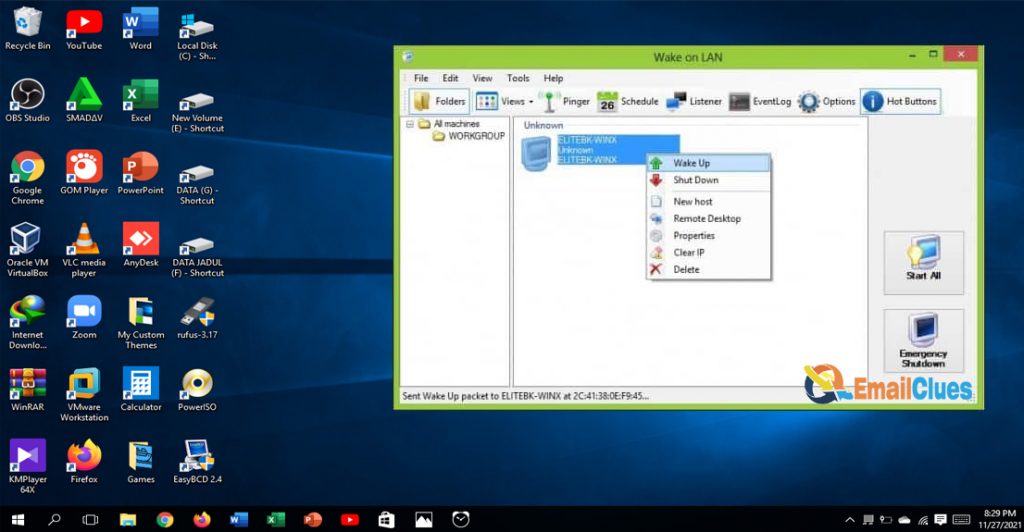
Wake Up A Computer Remotely with WOL
After configuring the WoL on your Windows you can easily get take control of it remotely. With the tool built on the router, you can easily take control of your computer. With the configuration, it’s easy to wake up a computer easily.
Open the Wake on LAN utility tool. Here it shows the all configured devices.
Select that device and click on Wake Up.
That’s it.
Troubleshoot Wake On LAN in Windows 10
If the WoL is not functioning well then there might be a couple of reasons. In this case, you need to fix the possible problems behind it. Depending upon the causes you can fix the Wake on LAN Doesn’t work in your Windows.
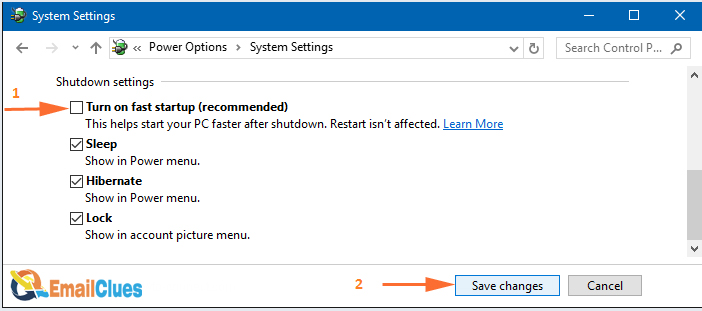
Basically, after upgrading the Windows you can face this problem. So, in this case, you can either update the BIOS of your Computer to fix it. Also, Turning off the Turn on fast startup from the power options also helps to get fix this problem.
Update BIOS/ Check WOL is enabled in BIOS
Here you can install the Latest Version of BIOS on your PC. Installing an updated and appropriate BIOS update help to fix the WoL Errors.
Disable Hybrid Shutdown
Disabling the Hybrid Shutdown mode from the Control Panel works in many cases. For this you can go to the Control Panel>Hardware and Sound>Power Options>Require a password on wakeup.
From there you need to uncheck the option Turn on fast startup and save it.