How to Setup Frontier Email with Android Phone?
Setup guide for Android SMTP settings
If you want to set up your Frontier email account on your Android phone, you’ve come to the right place. In this guide, we’ll walk you through the entire process step-by-step.
Before we begin, there are a few things you’ll need to have handy:
– Your Frontier email address
– Your Frontier email password
– The name of your Frontier email server (this will be something like “mail.frontier.com”)
With all of that out of the way, let’s get started:
1. Open the Settings app on your Android phone.
2. Tap the “Accounts & Sync” option.
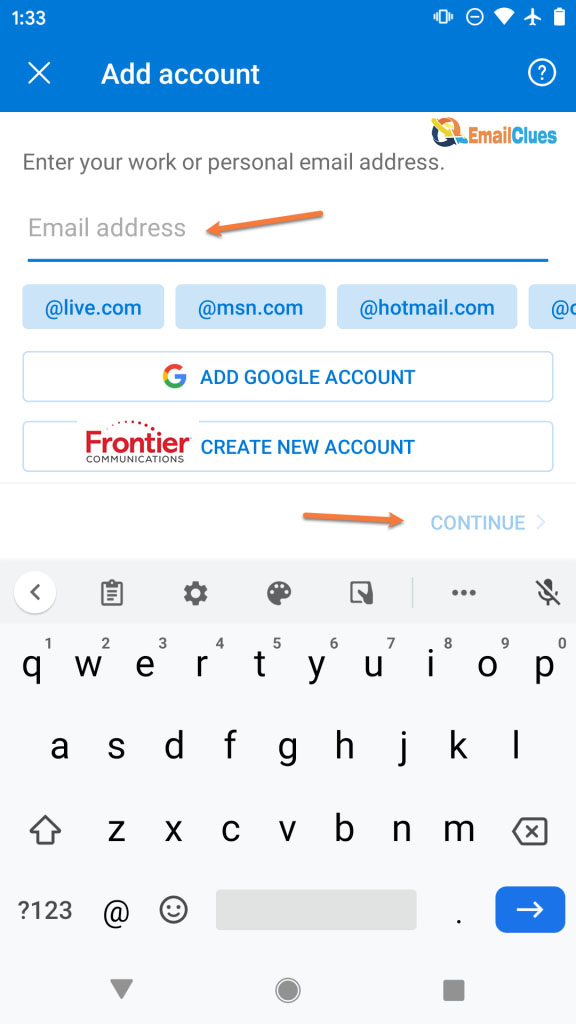
3. Tap the “Add Account” option.
4. Select the “Email” option.

5. Enter your Frontier email address and password, then tap the “Next” button.
6. If your email address and password are correct, you should see a “Success” message. Tap the “OK” button.
7. You’ll now be asked to enter the name of your Frontier email server. This will be something like “mail.frontier.com.” Once you’ve entered the server name, tap the “Next” button.
8. You should see a “Success” message if the server name is correct. Tap the “OK” button.
9. You’ll now be asked to choose how often you’d like your phone to check for new Emails. We recommend selecting the “Push” option so you’ll receive a new Email as soon as it arrives. Once you’ve made your selection, tap the “Next” button.
10. You’ll now be asked to choose what type of Email you’d like to receive. We recommend selecting the “All Email” option so that you’ll receive all new Emails in your inbox. Once you’ve made your selection, tap the “Next” button.
11. You’ll now be asked to enter a name for your account. This can be anything you want. Once you’ve entered a name, tap the “Next” button.
12. And, You’re almost done!
SMTP server Settings to Add Frontier Email mail
Frontier Email is an excellent email service that offers many features for its users. However, to take advantage of these features, you need to ensure that your email client is configured correctly. This includes adding the correct SMTP server settings.
You need to add two SMTP server settings to use Frontier Email with your Android phone. These are:
1) smtp.frontier.com
2) auth.frontier.com
The first setting, smtp.frontier.com, is the address of the Frontier Email SMTP server. This Server will be used to send emails from your Android phone.
The second setting, auth.frontier.com, is the address of the Frontier Email authentication server. This Server is used to verify your Frontier Email account credentials.
Both server settings must be added to your Android phone to use Frontier Email.
- To do this, open the Email app on your phone and go to the Settings menu. Then, select the Accounts option and choose the Frontier Email account.
- Next, select the Server Settings option and enter the two server addresses. Ensure the Use Secure Connection (SSL) box is checked for both servers.
- Once you have entered the two server settings, you can send and receive Frontier Email on your Android phone.
Add Frontier Email app to Android IMAP guide
If you’re a Frontier Email user, you know how important it is to stay connected to your inbox while on the go. Fortunately, it’s easy to add your Frontier Email account to your Android phone or tablet using the IMAP protocol. In this section, we’ll walk you through the steps to set up your Frontier Email account on your Android device.
Before we begin, you must ensure that your Frontier Email account has been set up to use IMAP.
- To do this, log in to your Frontier Email account and click the Settings gear icon in the upper-right corner.
- Then, click the Accounts tab and scroll down to the IMAP Access section. Ensure the Enable IMAP radio button is selected, then click the Save button.
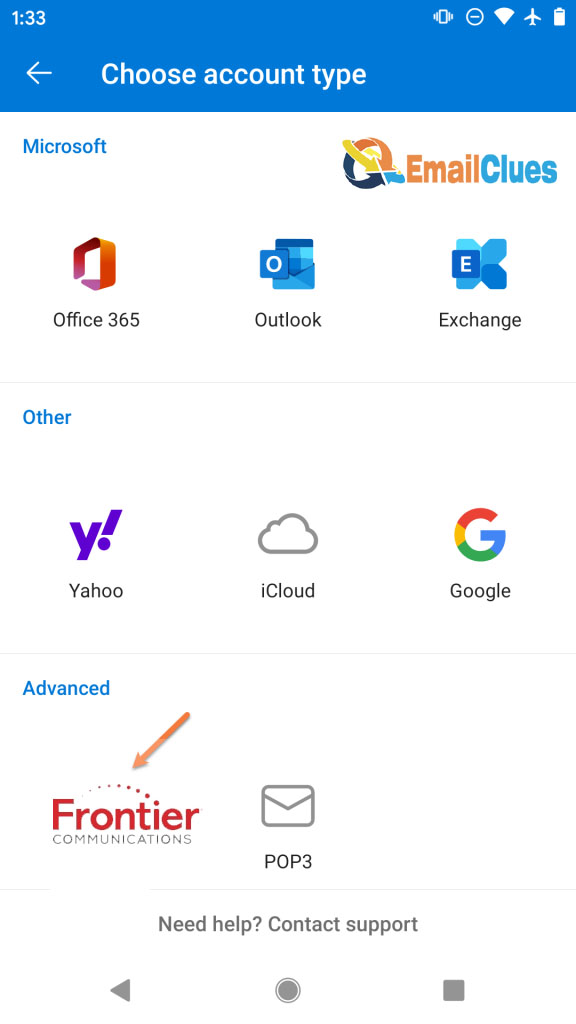
- Now that your Frontier Email account is configured for IMAP access let’s add it to your Android device. Open your device’s Settings app and tap the Accounts & Sync option. Tap the Add Account option and select Email from the list of account types.
- Enter your Frontier Email address and password on the next screen and tap the Next button. Your device will now attempt to connect to the Frontier Email servers to retrieve the account settings.
- If the account settings are successfully retrieved, you’ll be asked to select which account options you want to sync with your device. For most users, syncing the Email, Contacts, and Calendar options is recommended. Once you’ve made your selection, tap the Next button.
- That’s it! Your Frontier Email account is now set up on your Android device. You can access your inbox by opening the Email app.
Manual and Automatic Setup
Setting up your Frontier email on your Android phone is a pretty simple process and can be done either manually or automatically. Here’s a step-by-step guide to help you get started:
Manual Setup
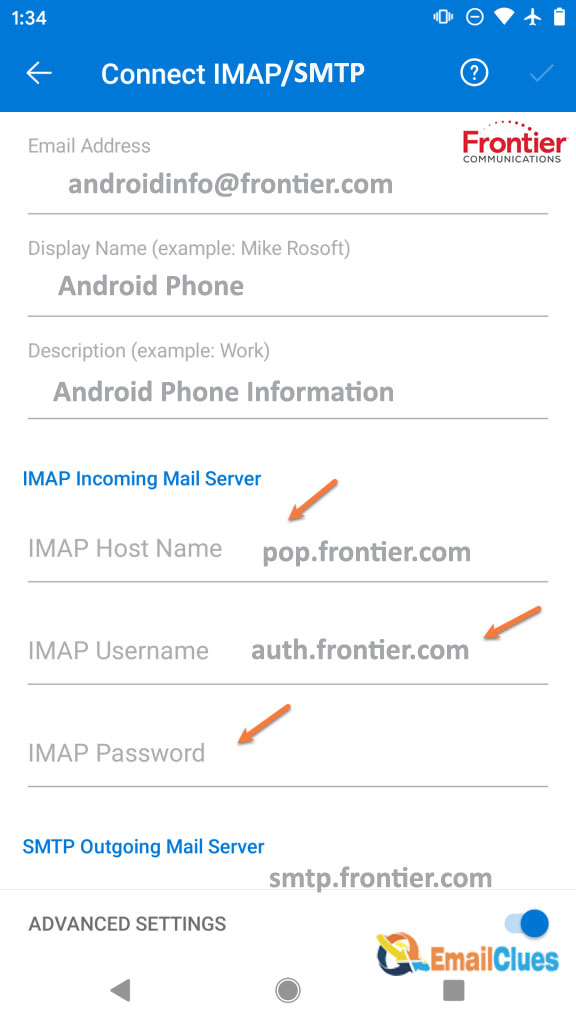
To manually set up your Frontier email on your Android phone, open the email app and select “Add Account.” Enter your Frontier email address and password, then select “Manual Setup.” Choose IMAP as your account type, and enter the following Frontier server settings:
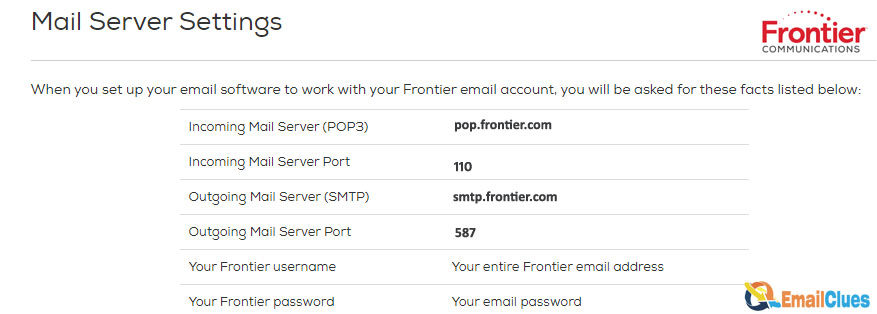
Incoming Server
- Incoming Server: pop.frontier.com
- Port: 110
- SSL: Off
Outgoing Server
- Outgoing Server: smtp.frontier.com
- Port: 587
- SSL: Off
Once you’ve entered all the necessary information, select “Next,” Your account should be set up and ready to go!
Automatic Setup
If you’d prefer to automatically set up your Frontier email on your Android phone, open the email app and select “Add Account.” Enter your Frontier email address and password, then select “Automatic Setup.” Your phone will then detect the Frontier email settings and configure your account. That’s all there is to it!


