How to Setup Frontier Email with Mac?
Setup Frontier Email with Mac
If you’re a Mac user, you can easily set up your Frontier email using the Mail app. Here’s a step-by-step guide on how to do it:
- Open the Mail app on your Mac.
- Click on the File menu and select Add Account.
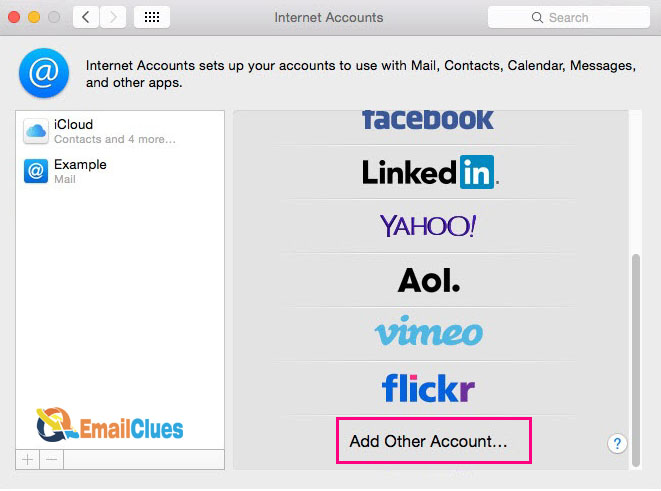
- Choose Other Mail Account from the list of options.
- Enter your Frontier email address and password, then click Sign In.
- Choose the IMAP or POP account type, depending on your preference.
- Enter the following Frontier email settings:
Incoming Mail Server:
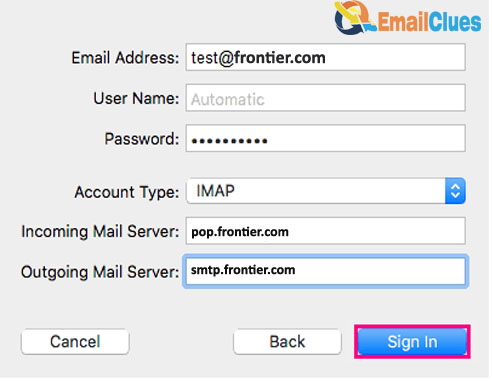
- Hostname: pop.frontier.com
- Port: 110
Outgoing Mail Server:
- Hostname: smtp.frontier.com
- Port: 587
- Click on Create. That’s it! Your Frontier email should now be set up on your Mac.
SMTP Settings for Mac Mail
If you’re a Mac user, you can set up your Frontier email account using the Mail app that comes pre-installed on your computer. Here’s a step-by-step guide on how to do it:
- Open the Mail app and click on the Add Account button.
- In the Add Account window, select Other Mail Account.
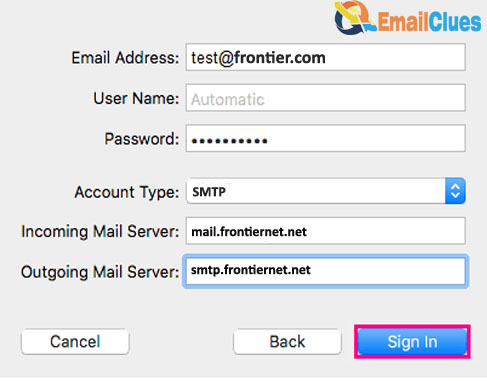
- Enter your Frontier email address and password, then click the Continue button.
- In the next window, enter the following Frontier email settings:
- For the incoming mail server, enter “mail.frontiernet.net.”
- For the outgoing mail server, enter “smtp.frontiernet.net.”
- For the username, enter your full Frontier email address.
- For the password, enter your Frontier email password.
- Click the Continue button.
- That’s it! Your Frontier email account should now be set up in the Mail app on your Mac.
Does Apple still support Frontier Email?
You might be wondering, does Apple still support Frontier Email? The answer is yes! You can still use your Frontier Email account on your Mac, and we’ll show you how.
- First, open the Mail app on your Mac. Then, click on the File menu and select “Add Account…”
- Next, enter your name, Frontier Email address, and password. Then, click “Continue.”
- The Mail app will automatically configure your account settings. Once it’s finished, click “Done.”
- That’s it! You can now start using your Frontier Email account on your Mac.
Wont Mac verify my Frontier Email
If you’re a Mac user, you may be wondering why your Frontier email account won’t verify. There are a few possible reasons for this, so let’s take a look at each one.
- The first possibility is that you’re using the wrong email address. Make sure that you’re using the full email address, including the @frontier.com part.
- The second possibility is that you’re using the wrong password. Make sure that you’re using the password that you created for your Frontier email account.
- The third possibility is that your account has been suspended. If this is the case, you’ll need to contact Frontier customer support to have your account unsuspended.
- The fourth possibility is that there’s an issue with the Frontier servers. If this is the case, you’ll need to wait until the issue is resolved before you’ll be able to access your account.
- If you’re still having trouble accessing your Frontier email account on your Mac, contact Frontier customer support for further assistance.
Mac keep asking for my Frontier Email password
If you’re using a Mac and Frontier Email, you may have noticed that the email program keeps asking for your password. This can be frustrating, especially if you’re not sure why it’s happening.
Some common reasons are listed below:
Email is not set up correctly
To fix this, you’ll need to open the Email program and go to the “Accounts” section. From there, you’ll need to find your Frontier Email account and make sure that the “Incoming Mail Server” and “Outgoing Mail Server” settings are correct.
Email is not set up to use the correct ports
To fix this, you’ll need to open the Email program and go to the “Accounts” section. From there, you’ll need to find your Frontier Email account and make sure that the “Incoming Mail Server” and “Outgoing Mail Server” settings are set to the correct ports.
Email is not set up to use the correct authentication method
To fix this, you’ll need to open the Email program and go to the “Accounts” section. From there, you’ll need to find your Frontier Email account and make sure that the “Incoming Mail Server” and “Outgoing Mail Server” settings are set to the correct authentication method.
Enable SMTP on Mac
One of the great things about using a Mac is that you can take advantage of all the amazing features that Apple offers. One of those features is the ability to send and receive email using the built-in Mail app.
If you’re a Frontier Email customer, you can easily set up your account on your Mac so that you can check your email anytime, anywhere. In this section, we’ll show you how to enable SMTP on your Mac so that you can start sending and receiving Frontier Email messages.
- First, open the Mail app on your Mac. Then, click on the File menu and select Add Account.
- On the next screen, select Other Mail Account and click Continue.
- Enter your Frontier Email address and password, and click Sign In.
- Now, you’ll need to enter some additional information about your Frontier Email account. Enter the following information in the appropriate fields:
- Account Type: POP3
- Incoming Mail Server: pop3.frontier.com
- Outgoing Mail Server: smtp.frontier.com
- User Name: Your Frontier Email address
- Password: Your Frontier Email password
- Click Sign In.
- That’s it! Your Frontier Email account is now set up on your Mac and you can start sending and receiving messages.
SMTP server for Mac Mail
When you set up your Frontier email account in Mac Mail, you’ll need to enter the following information in the Incoming Mail Server and Outgoing Mail Server fields:
Incoming Mail Server:
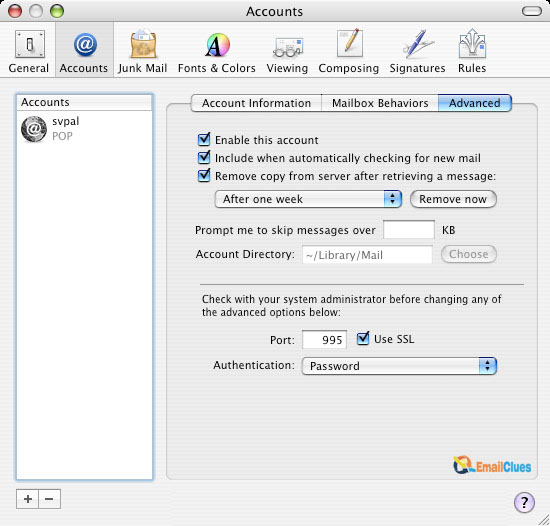
- Server Name: mail.frontier.com
- Port: 995
- SSL: Yes
Outgoing Mail Server:
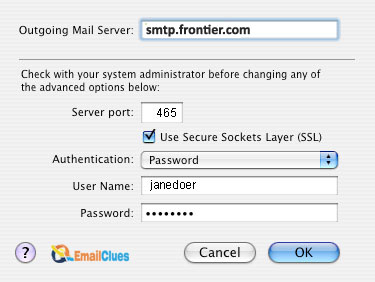
- Server Name: smtp.frontier.com
- Port: 465
- SSL: Yes
- Authentication: Yes
- Username: Your Frontier email address
- Password: Your Frontier password
Now that you have all the information you need, let’s get started!
- Open Mac Mail and select Mail > Preferences from the menu bar.
- Click the Accounts tab.
- Click the + sign to add a new account.
- Select Other Mail Account from the list of account types and click Continue.
- Enter your name, Frontier email address, and password in the relevant fields and click Sign In.
- Mail will try to automatically configure your account settings. If not, click the Configure Manually button.
- Select IMAP from the Account Type drop-down menu.
- Enter the following information in the Incoming Mail Server and Outgoing Mail Server fields:


