Deployment Image Servicing and Management (DISM) to Repair Local Image on Windows 11?

Deployment Image Servicing and Management is one of the finest tools inbuilt in Windows. Using this troubleshooting command, you can fix the many errors related to your system. This method works for you if you are having issues with the Local images in Windows. Check this tutorial on How to use DISM to repair local images on Windows 11 and later.
Use DISM to Repair Local Windows Image
The fundamental issues related to the Windows Images and system files can be checked and repaired with the commands like SFC and CHKDSK. But if these don’t work, then the DISM is your best and most robust method. In short, using DISM is the last option to repair the Local images on the PC.
DISM is the system repair command that finds the critical core files required to run and gathers information to repair the corrupted files in Windows. This one is the final repair command that works without cleaning your windows. Among the 15 ways to repair images check the most successful method.
Causes of Local Image Corrupted in Windows
Mainly there are two major causes of the problems behind it.
- Third-party apps &
- System file corruption
How to Use DISM to Repair Local Image on Windows 11 Automatically
The DISM Scan allows the users to detect and repair the issues with three options. Firstly, we used to perform CheckHealth, ScanHealth, and RestoreHealth. Depending on the issues, you can give the commands as it is. Here’s how,
Check File Integrity: Check Health and Scan Health
Firstly we need to check and scan the files. After checking the health status and finding out the system corrupted image files in Windows, we need to repair it. Check this,
Check Health
This options helps to determine the system status. It shows the Windows images corrupted files from the local image.
- Open CMD as an Administrator or Open the Terminal.
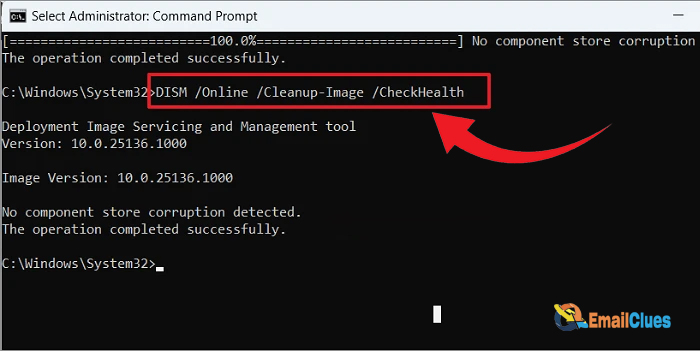
- Type the command DISM /Online /Cleanup-Image /CheckHealth and hit Enter.
- Wait and see the result.
- After the process ends, the Deployment Image Servicing and Management tool shows the component store corruption to be repaired. If not, then it shows it detected no component store corruption.
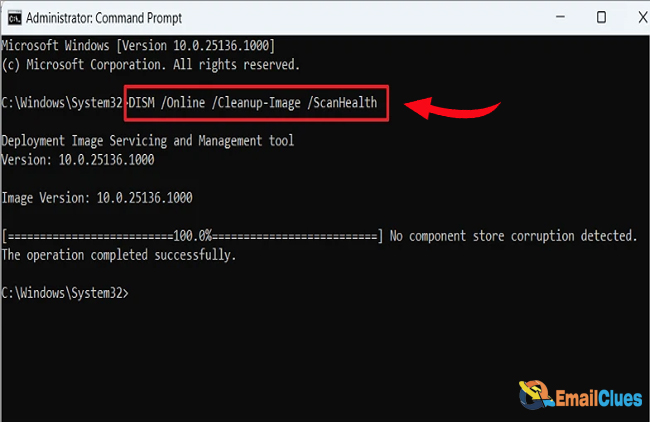
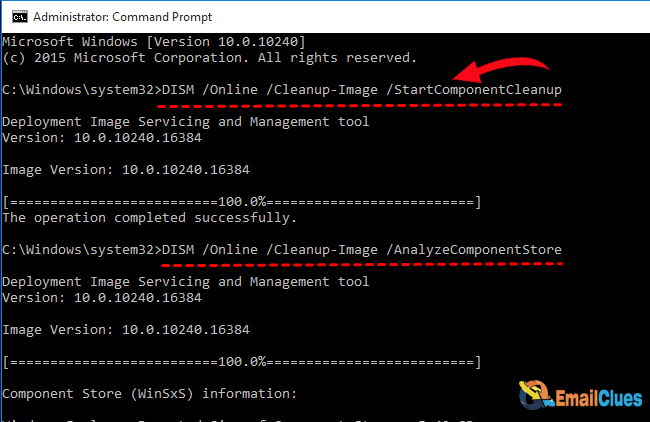
Scan Health
Scan Health process helps to find issues regarding the corrupted local image on Windows 11.
- Search the cmd and right click then select the Run as administrator. It will open the cmd with an administrator’s permission.
- Type the command DISM /Online /Cleanup-Image /ScanHealth and hit Enter.
- This will begin the scanning process. Wait until the process gets ends.
- After a while, check the status.
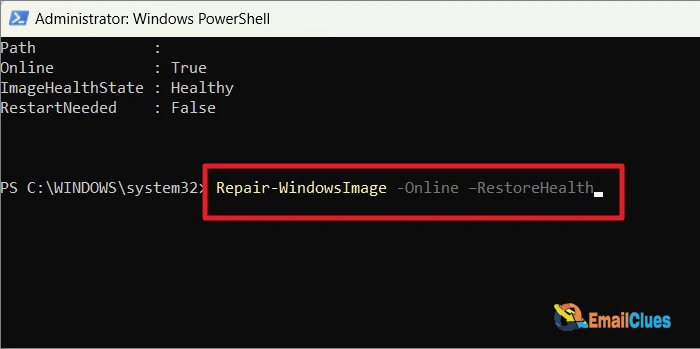
Restore Health
This is the final process through which the system automatically scans and repairs the system issues related to the local images in Windows 10 and 11.
- Open the cmd as above process and give the command, Enter: DISM /Online /Cleanup-Image /restorehealth, then hit Enter.
- Wait for scanning.
- After completing the process, the DISM will download the required updates and files from the Windows servers.
- Just wait to download and repair the damaged files.
- That’s it.
That’s how you can check, scan and repair local images on Windows 11.
Here we include a helpful guide on How to use DISM to repair local images on Windows 11.
Repair local images on Windows 11 manually.
As the DISM method needs an active internet connection. But if you are not connected to the Internet, you can also have an option to repair local images on Windows 11 manually.
Repair Local Image by configuring ‘install.wim.’
With the Windows 11 ISO file, you can find all the essentials to fix the corrupted local image files. Depending upon the Windows Version you installed, you need to download the same ISO package first. Or, if you have already downloaded it, you don’t need to download it. If not, download it first.
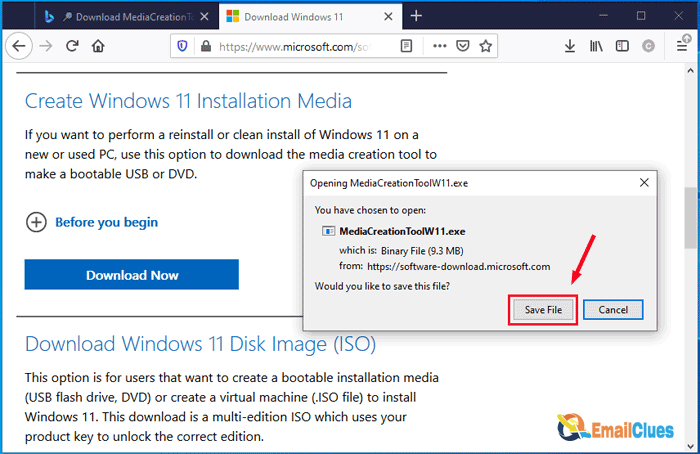
Step I – Downloading the ISO File (Skip this if you have IOS File already)

- Visit the Download Center of Microsoft to download the ISO files. (If your PC is running on Windows 11 Home Edition, then choose the same as it is)
- Under the Download Windows 11 Disk Image (ISO), you must select Windows 11 and its version.
- Then click on Download. Here it will ask you to select the installation language. Choose English UK/USif your PC is running in the English language.
- Decide the Architecture (32bit or 64bit), Confirm the package detail and click on Download.
Step II – Configuring
After downloading the package, you must mount the ISO File to File Explorer. To move the file to Drive E.
- Confirm the driver’s letter E from there.
- After this, you can use the Source to repair the image manually.
Step III – Repair Image with Recovery Image
- Open the cmd as an Administrator.
- Type the following command, DISM /Online /Cleanup-Image /restorehealth /Source: E:\Sources\install.wim, and hit Enter.
- For the path of installation.wim you need to change the C to E, like ‘E:\Sources,‘
- After completing the above steps, the DISM process will begin to scan and repair the issues related to the image.
That is How to use DISM to repair local images on Windows 11 manually. Although this process is complex, it works for you. You can follow this method if you don’t have a live internet connection. This process will fix a corrupted file.
How do I run the DISM scan?
Although SFC tools play an essential role in repairing the system files, they may not be as effective as DISM scans. Here’s the process on How to Run DISM Scan in Windows 11.
- Open the Terminal. You can open the terminal simply by right-clicking on the desktop. If not, you can run the cmd as an administrator too.
- To run the Scan, you need to give the command, type/copy the DISM /Online /Cleanup-Image /CheckHealth.
- Hit enter and wait. If it shows an error, then re-start the CMD or Terminal.
- The process will start to fix a corrupted file. That’s it.
Note: To run the DISM Scan, you must have an active internet connection. So, connect your PC to the Internet while performing any repair features using DISM.
Automatic Repair Loop: Fix a Corrupted Image File while modifying with DISM
In the rear case, the local images on Windows 11 will get corrupted while modifying the DISM. In this case, you can use the Mount Points features to fix this issue.
If Automatic Repair Loop, then you can type the /Cleanup-MountPoints command.
FAQ
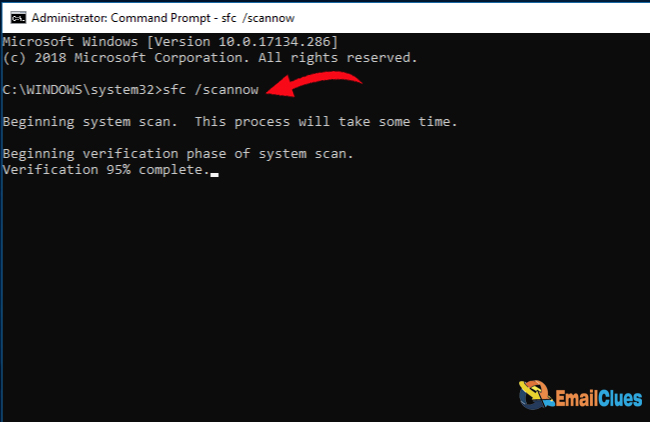
Should I Run DISM or SFC First?
Both commands are helpful in scanning and repairing the system’s corrupted files, but it is recommended to run the SFC First.
Why Automatic Repair Loop?
Sometimes automatic repair process gets looped due to file modification on DISM.
How to fix Corrupted Image Files?
To fix corrupted image files, you can run the DISM Repair.
Conclusion
With this article, we are happy to guide you on How to use DISM to repair local images on Windows 11. The 15 ways to repair images automatically and manually work on you.