How to Setup Gmail with laravel?
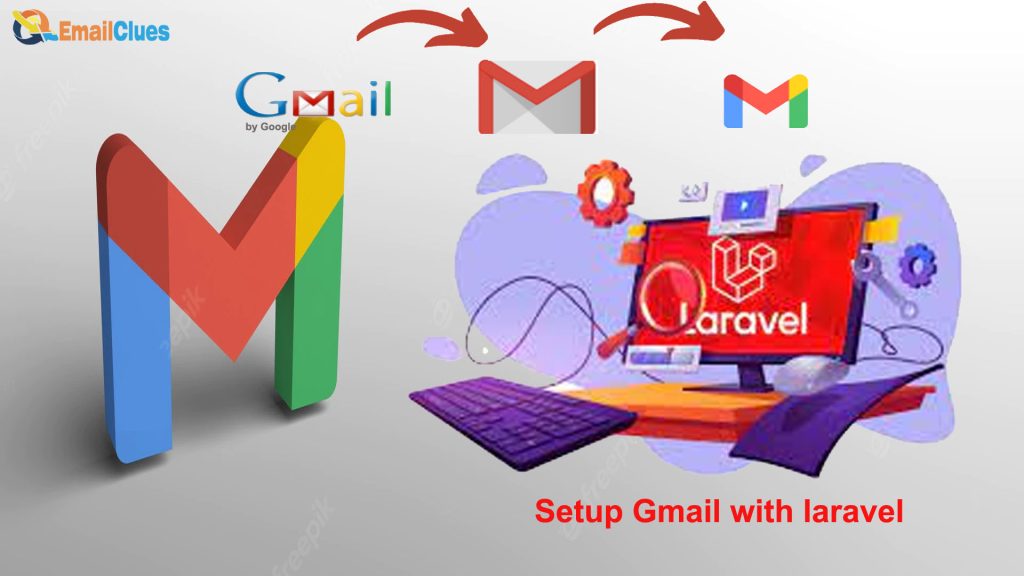
Laravel is a web application used as a framework with expensive, elegant syntax. It is the open-source PHP framework that otwell first created. Here’s the tutorial on setting up Gmail with Laravel.
For the Laravel Lovers, it’s really easy to send Mail using gaming in Laravel. Regarding this, we need to follow certain authentication steps. Here are the Serer Settings, including the SMTP Settings to be taken.
7 Steps to Setup Gmail with Laravel
If you’re interested in laravel, your mind ultimately says, how can I send an email through my Gmail account?? Here we provide you with the solution for that.
Step I – Configure Gmail SMTP Server
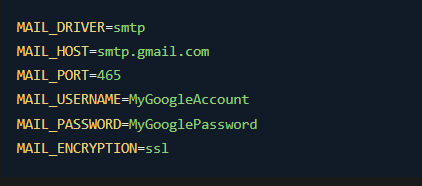
First, you must configure the Laravel application’s mail server. To sort the Mail, the laravel uses the config/mail.php file. So, you need to update the new variable containing the MAIL_DRIVER, MAIL_HOST, etc.
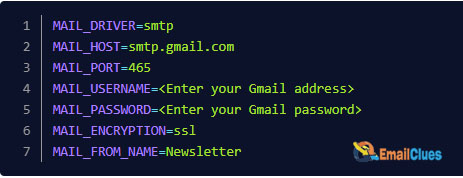
Open the .env file, and you can find this file in the root directory of the project.
Edit the default details of the .env file as follows,
MAIL_DRIVER=smtp
MAIL_HOST=smtp.gmail.com
MAIL_PORT=465
MAIL_USERNAME=<Enter your Gmail address>
MAIL_PASSWORD=<Enter your Google App passwords>
MAIL_ENCRYPTION=ssl
After editing, update the following variable.
Step II – Configure the Google Account Settings
In the second step, you need to configure the google settings. It’s a security configuration, don’t worry.
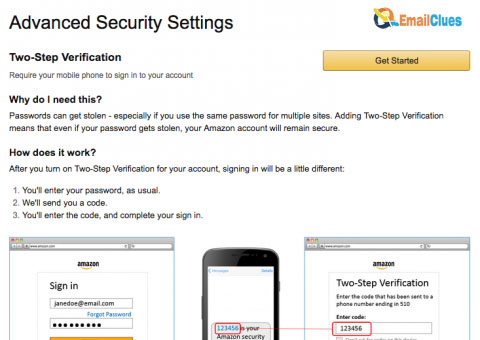
- Go to the Google Security Page from the link. Or Click on the Gmail Account profile icon shown in the top left edge of your desktop screen in the Browser.
- Go to the Security options from the Google Account Page.
- Turn on 2-Step Verification.
- Now create the app passwords. You can create the password you have to use on .env as MAIL_PASSWORD.
Step III – Create the Models and Migrations
After configuring the Google Account Settings, you must create a Subscriber Model with Migration.
Run the Command in the Terminal,
PHP artisan make: model Subscriber -m
To enable mass assignment, update the Subscriber.php file by adding the code at the top of the file,
class Subscriber extends Model
{
use HasFactory; protected $guarded = [];
}
Now again, use the following code to update the Subscriber Migration table,
public function up()
{
Schema::create(‘subscribers’, function (Blueprint $table) {
$table->id();
$table->string(’email’);
$table->timestamps();
});
}
Step IV – Establish Database Connection
In this step, you need to create a database in PHPMyAdmin. Afterward, you must add and update the new variable/code in the .env file. Here’s
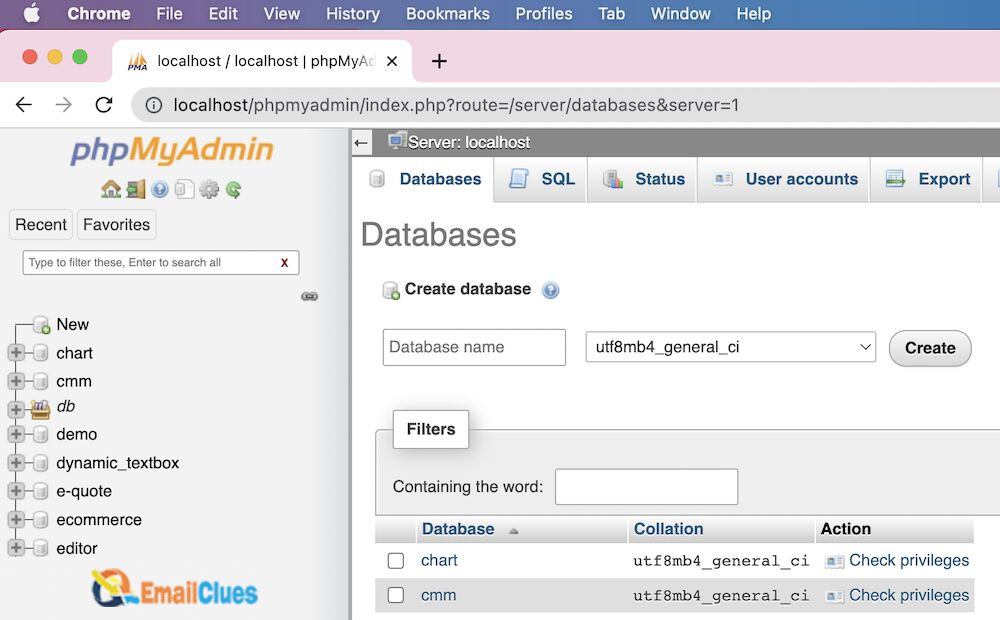
Paste the following code in the .env file, and update the file
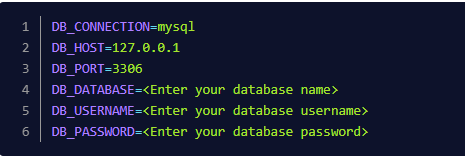
DB_CONNECTION=mysql
DB_HOST=127.0.0.1
DB_PORT=3306
DB_DATABASE=<Enter your database name>
DB_USERNAME=<Enter your database username>
DB_PASSWORD=<Enter your database password>
After the successful update of the .env file, you must clear the cache.
Give the following Command,
PHP artisan config: cache
Now run the database migrations. Give the following Command,
PHP artisan migrate
Step V – Generate & Create Mailable
Now you need to create a Mailable to set up Gmail with laravel.
Create a mailable
(app/Mail/Subscribe.php)
Its corresponding view template
(resources/views/emails/subscribers.blade.php),
Then run the given Artisan Command,
PHP artisan make: Mail Subscribe –markdown=emails.subscribers

Create a SubscriberController available at App\Http\Controllers\SubscriberController.PHP :
Now add the given Command at the App\Mail\Subscribe.PHP.
<?phpnamespace App\Mail;use Illuminate\Bus\Queueable;
use Illuminate\Contracts\Queue\ShouldQueue;
use Illuminate\Mail\Mailable;
use Illuminate\Queue\SerializesModels;class Subscribe extends Mailable
{
use Queueable, SerializesModels; public $email; /**
* Create a new message instance.
*
* @return void
*/
public function __construct($email)
{
$this->email = $email;
} /**
* Build the message.
*
* @return $this
*/
public function build()
{
return $this->subject(‘Thank you for subscribing to our newsletter’)
->markdown(’emails.subscribers’);
}
}
Step VI – Write the Markdown Message and Create Routes
Go to the resources/views/emails/subscribers.blade.php to access the Blade file in the system. Paste the following variable there,
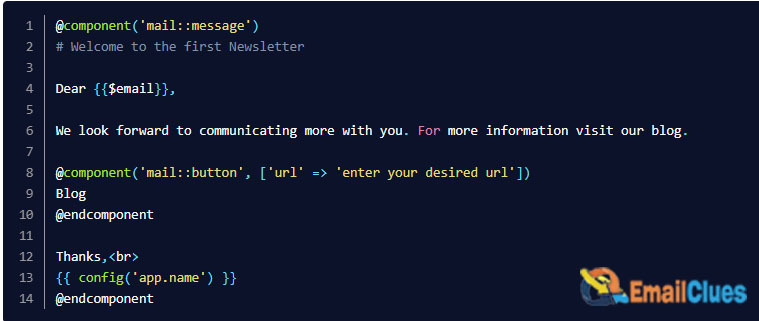
@component(‘mail::message’)
# Welcome to the first NewletterDear {{$email}},We look forward to communicating more with you. For more information visit our blog.@component(‘mail::button’, [‘url’ => ‘https://laraveltuts.com’])
Blog
@endcomponentThanks,<br>
{{ config(‘app.name’) }}
@endcomponent
Creating the Routes to Setup Gmail with laravel
Create the routes for Laravel. Here you need to create a new API Routes with the given variable,
<?phpuse Illuminate\Http\Request;
use Illuminate\Support\Facades\Route;use App\Http\Controllers\SubscriberController;/*
|————————————————————————–
| API Routes
|————————————————————————–
|
*/Route::middleware(‘auth:sanctum’)->get(‘/user’, function (Request $request) {
return $request->user();
});Route::post(‘/subscribe’, [SubscriberController::class, ‘subscribe’]);
Step VII – Authorize the Final Access
After configuring and authorizing all the processes, you need to test the application. Give the Command,
PHP artisan serve
Send Mail Using Gmail in Laravel
After successfully Setup Gmail with laravel, you can send Mail easily with the Mail App or Gmail. Here are the steps to be followed to send Mail using Gmail in Laravel.
Install the Laravel 9 latest version and configure the SMTP Settings
Create a Mail Class and Controller
Create an Email Directory and Blade View
Set an Email Route to Send
Run the Testing to Finalize the Process
Set Server Settings
Most email apps like Outlook can automatically configure email server settings. If you need server settings or help to find your server settings, you must read it carefully.
1. Sign in to your account using an outlook web app.
2. Find the outlook web app on the toolbar, and select settings mail, POP, and IMAP.
3. The POP3, IMAP4, and SMTP server names and other settings you may need to enter are listed on the POP and IMAP settings page.
Configure SMTP settings
You can use Outlook to read and send Mail from yahoo or Gmail. Hotmail and other email accounts. If you want to manually add another email account to Outlook, you may need to use an advanced setup.
You will need your email provider’s incoming server settings (POP or IMAP) and outgoing server settings (SMTP)