Server settings for Outlook 365
If you’re a Juno user, you know that Juno is a great email service with a lot of features. But what if you want to use Outlook 365? Can you still use Juno? The answer is yes! You can configure Juno to connect with Outlook 365, and in this blog post, we’ll show you how.
- First, you’ll need to open the Juno Control Panel. You can do this by clicking the Start button, then selecting All Programs > Juno > Juno Control Panel.
- Once the Juno Control Panel is open, click the Email Accounts button.
- On the Email Accounts screen, make sure that the My incoming mail server is a Juno server option is selected, then click the Next button.
- On the next screen, you’ll need to enter your Juno email address and password, then click the Next button.
- On the next screen, you’ll need to select the POP3 option, then enter the following settings:
- Incoming mail (POP3) server: pop.juno.com
- Outgoing mail (SMTP) server: smtp.juno.com
- Click the Next button when you’re done.
- On the next screen, you’ll need to enter your name and Juno email address, then click the Next button.
- On the last screen, you can optionally select the Remember password checkbox, then click the Finish button.
That’s it! You’ve successfully configured Juno to connect with Outlook 365.
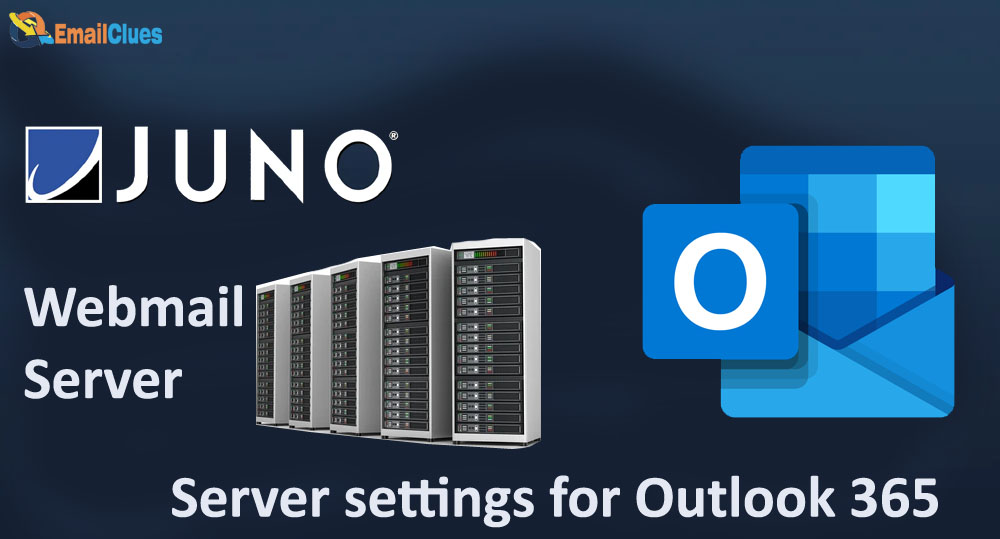
Server settings for Outlook 365

- IMAP server name: outlook.office365.com
- IMAP port: 993
- IMAP encryption method: TLS
- POP server name: outlook.office365.com
- POP port: 995
- POP encryption method: TLS
- SMTP server name: smtp-mail.outlook.com
- SMTP port: 587
- SMTP encryption method: STARTTLS
Setting Up the Port Connection
If you’re using Microsoft Outlook 365, you can set up Juno Email on Outlook 365 by following these simple steps:
1. Open Outlook 365 and click the “File” tab.
2. Click “Add Account.”
3. Enter your Juno email address and password.
4. Click “Next.”
5. Outlook will now try to automatically configure your Juno email settings.
6. If Outlook is successful, you’ll see a “Congratulations” message. Click “Finish.”
7. If Outlook is unable to automatically configure your Juno email settings, you’ll need to enter them manually. Click the “Manual setup or additional server types” option and click “Next.”
8. Select the “POP or IMAP” option and click “Next.”
9. Enter the following Juno email settings:
- Incoming mail server (POP3): pop.juno.com
- Outgoing mail server (SMTP): smtp.juno.com
- Username: Your Juno email address
- Password: Your Juno email password
10. Click “More Settings.”
11. Select the “Outgoing Server” tab.
12. Check the “My outgoing server (SMTP) requires authentication” option.
13. Select the “Use same settings as my incoming mail server” option.
14. Click the “Advanced” tab.
15. Enter the following Juno email settings:
- Incoming server (POP3): 110
- Outgoing server (SMTP): 25
- Use the following type of encrypted connection: None
16. Click “OK” and then “Next”.
17. That’s all! Done
You should now be able to send and receive Juno email on Outlook 365.
Account Management
If you’re using Outlook 365, you can easily integrate your Juno email account by following these simple steps:
1. Log in to your Outlook 365 account and click on the “Settings” gear icon in the top right corner.
2. Select “View all Outlook settings” at the bottom of the menu.
3. Click on the “Accounts” tab in the left sidebar.
4. Under the “Email” section, click on the “Add account” button.
5. Enter your Juno email address and click “Next.”
6. Enter your Juno password and click “Sign in.”
7. Outlook will now begin the process of setting up your account. Once it’s finished, you’ll be able to access your Juno email messages directly from Outlook 365.
Accessing Your Mail
Assuming you have already set up your Juno account in Outlook, you can access your mail by following these steps:
1. Open Outlook and click on the “Mail” tab in the navigation pane.
2. In the “All Mail Folders” section, click on the folder that contains your Juno mail.
3. Your Juno mail will now be displayed in the main window.
Sending and Receiving Process
Assuming that you have Outlook 365 installed on your computer, the process of setting up Juno email should be relatively simple. In this guide, we’ll walk you through the steps of configuring your Juno email account in Outlook 3
- First, open Outlook and click on the File tab. Then, click on the Account Settings button and select Add Account from the drop-down menu.
- On the next screen, select Manual setup or additional server types and click Next.
- On the next screen, select POP or IMAP and click Next.
- Enter your Juno email address in the Email Address field and click Next.
- On the next screen, enter the following Juno POP server settings:
-POP server: pop.juno.com
-Port: 995
-SSL: Yes
-Username: Your Juno email address
-Password: Your Juno password
- Click the More Settings button.
On the next screen, select the Outgoing Server tab and check the My outgoing server (SMTP) requires authentication box. Then, select the radio button next to Use same settings as my incoming mail server.
- Click the Advanced tab and enter the following Juno SMTP server settings:
-SMTP server: smtp.juno.com
-Port: 465
-SSL: Yes
-Username: Your Juno email address
-Password: Your Juno password
- Click the OK button.
- On the next screen, click the Next button.
- Outlook will now attempt to connect to the Juno servers. If the connection is successful, you should see a screen that says Congratulations! Your email account has been successfully configured.
- Click the Finish button.
Your Juno email account should now be up and running in Outlook 365.
Why you should consider using Juno with Outlook 365?
If you’re looking for an email client that integrates seamlessly with Outlook 365, you should definitely consider using Juno. Here are three reasons why:
1. Juno integrates seamlessly with Outlook 365, so you can manage all your email accounts from one place.
2. Juno offers a variety of features that can make managing your email accounts easier, such as the ability to create custom folders and filters.
3. Juno also offers a variety of security features that can help keep your email accounts safe, such as the ability to automatically encrypt your email messages.